dCloud Help
Find the answers you need to get started using dCloud.
Connect Android Device to a Cisco dCloud Session
February 2018
When using an Android device for a Cisco dCloud session, the Android device must be connected to the Cisco dCloud environment. There are two options for connecting the Android device to the dCloud environment:
- Connect to the wireless network of a router
- Connect to another available wireless network and then configure Cisco AnyConnect
Only one of these connection methods is required. Both are described below.
Connect to Wireless Network on a Router
To connect an Android device to an active Cisco dCloud session using a router configured for dCloud:
- On your Android device, go to Settings > Wi-Fi.
- From the list of Networks, select the data network associated with your router. For example, cisco-dcloud-data-kit-XX (where XX represents the identifier assigned when you registered your router).
- When prompted, type the password adgjmptw and then tap Connect.
Your Android device receives an IP address and is now active on the network.
Connect to dCloud Session Using Cisco AnyConnect
You must be logged into the dCloud UI and your session must be active to perform this activity.
Connect an Android device to an active Cisco dCloud session using Cisco AnyConnect to:
Add New Connection
To add an Android device to an active Cisco dCloud session using Cisco AnyConnect by adding a new connection:
- Connect your Android Device to a local wireless connection.
- From a browser on your Android device go to http://dcloud.cisco.com and log in with your Cisco.com credentials.
- In dCloud, go to My Hub > Sessions, locate your active session, and then Click View.
- Open Details > Session Details to view the AnyConnect Credentials for your session.
- Download and install Cisco AnyConnect from Google Play Store, if it is not already installed on your Android device.
- Launch AnyConnect.
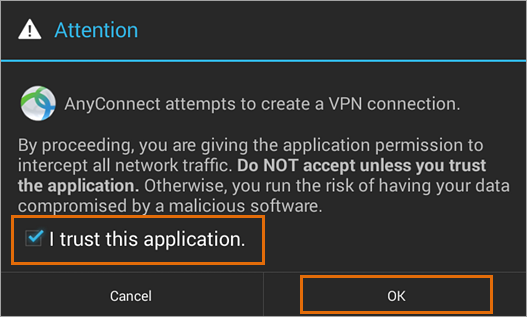
- Tap Allow (or OK), if prompted. A confirmation window may open the first time you start AnyConnect.
- Tap Add New VPN Connection.
- In the Connection Editor window:
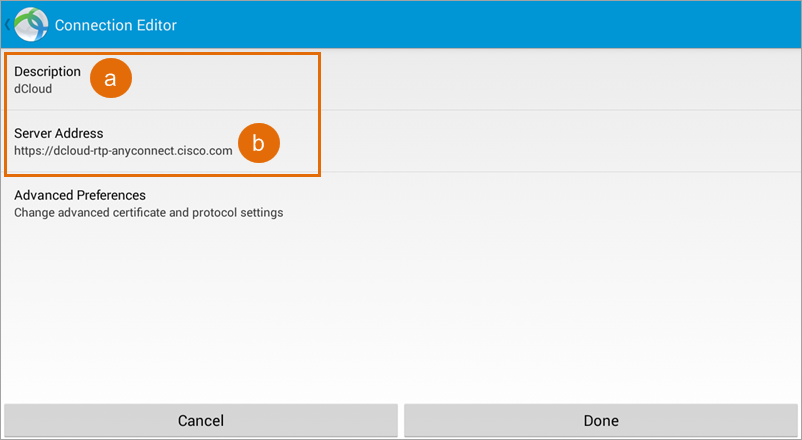
- Enter a Description.
- Enter the Server Address using the Host URL listed in the AnyConnect Credentials section in dCloud. In the example below, the Host URL for the dCloud RTP data center is used. The Host URL will vary, depending on the dCloud data center used to schedule your session.
- Tap Advanced Preferences.
- In the Advanced Preferences window, verify or update the following settings:
- Certificate is set to Disabled.
- To change this setting, tap the Certificate row and then choose Disabled on the Select Certificate window.
- Connect with IPsec is unchecked.
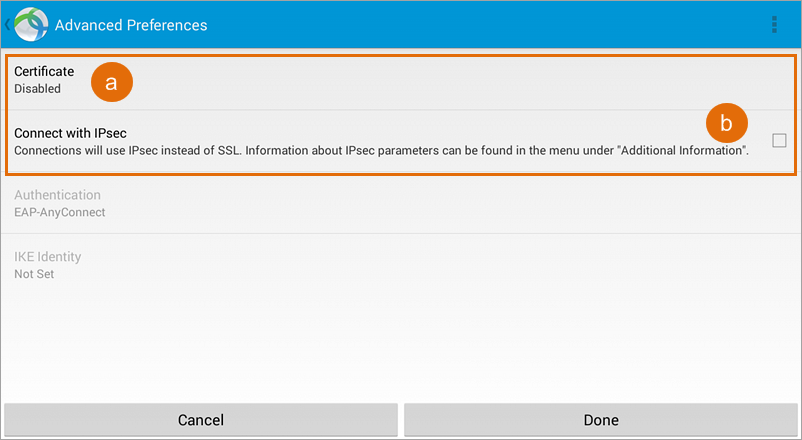
- Certificate is set to Disabled.
- Tap Done, and then tap Done again.
- In the Connections row, tap the dCloud entry you just created.
- In the AnyConnect window, enter a Username and Password from the AnyConnect Credentials section of your dCloud demo. The usernames and passwords are dynamically generated per dCloud session.
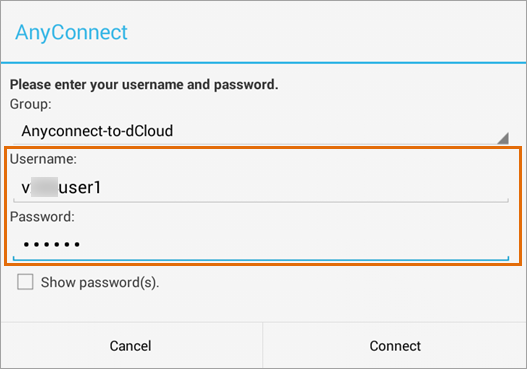
- Tap Connect.
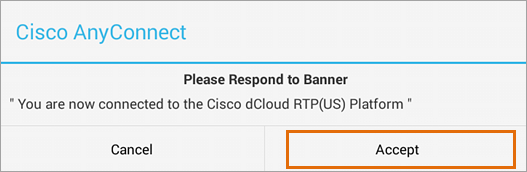
- A message will display to confirm your connection to the dCloud environment. In the example below, the message confirms connection to the dCloud RTP Platform. The actual message will differ depending on the dCloud data center used to schedule your session. Tap Accept. Your device is now connected.
- In the Attention pop-up, place a checkmark next to I trust this application, and then click OK.
Edit Existing Connection
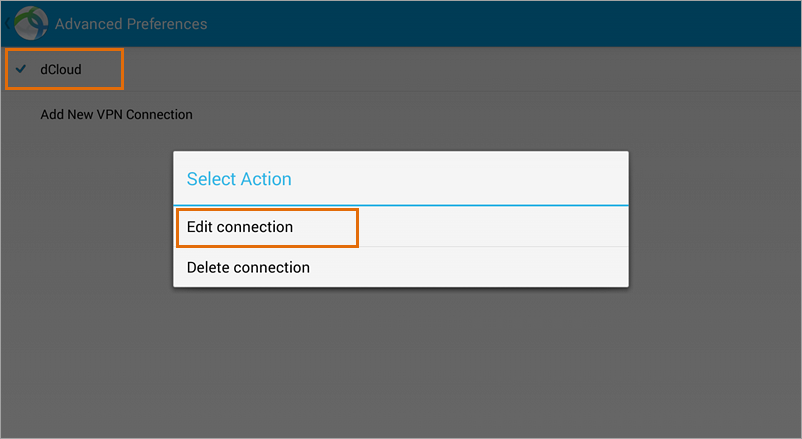
To add an Android device to an active Cisco dCloud session using Cisco AnyConnect by editing an existing connection:
- Launch AnyConnect.
- In the Connections row, tap the dCloud entry you want to edit.
- Tap and hold dCloud and then in the Select Action popup, tap Edit connection.
- Update the VPN connection settings as needed.
- Optionally, tap Delete connection to remove the VPN connection entry.
- Tap OK.
![]() Back to top
Back to top
