dCloud Help
Find the answers you need to get started using dCloud.
Configure Single Number Reach
January 2017
To better illustrate the configuration requirements, the instructions below include steps to configure single number reach (SNR) for Adam McKenzie on Workstation 1. However, you can complete this activity for other preconfigured users and/or workstations as shown in the documentation for your session.
You must be logged in to the Cisco dCloud UI and have an active session to complete this activity.
Configure Single Number Reach for Collaboration
- On Workstation 1 launch Internet Explorer and navigate to Collaboration User Links > CUCM User Pages.
- Continue to the website and allow or accept any prompts to trust site.
- Login using Adam McKenzie’s credentials from your specific session: User Name: ***; Password: ***.
- Go to Phones > My Phones > Additional Phones and then click the plus sign [
 ] to add a new phone for the user.
 - In the Phone Number or URl field, enter the mobile number in the correct format for your session environment as shown in Dialing Patterns for Outbound Dialing.
- Enter a Description for the alternate number (for example, Mobile Phone).
- Ensure the following check boxes are checked: a. Enable Single Number Reach b. Enable Move to Mobile
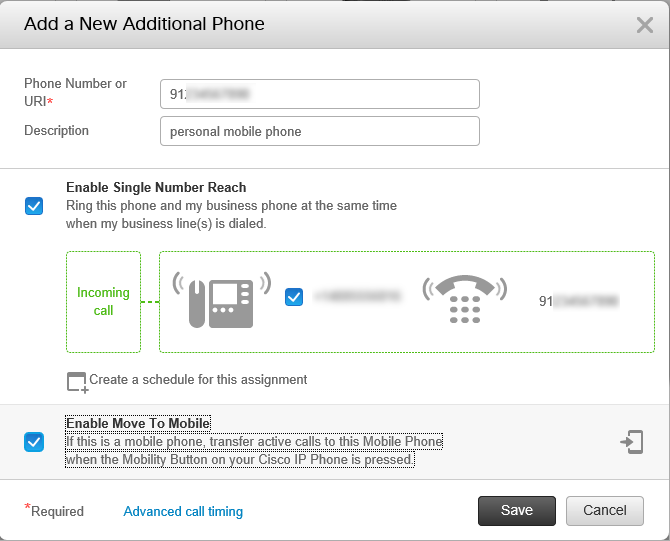
- To adjust the threshold times for call transfer, click the Advanced call timing link. Each menu option controls a different portion of the call transfer process:
a. Wait XX.X seconds before ringing this phone when my business line is dialed. This option allows you to set the amount of time your desk phone will ring before trying to contact you at the new number.
b. Prevent this call from going straight to this phones voicemail by: If you choose “requiring you to respond to a prompt to be connected”, the system puts this call on hold and presents you with a prompt that requires you to enter a digit on your phone to answer the call rather than send it to voicemail. If the “using a time delay of X.X seconds..“ option is chosen, the system gives a time delay of X.X seconds before sending the caller to voicemail.
c. Stop ringing this phone after XX.X seconds to avoid connecting to this phones voicemail. You can set a ring time that will not allow the caller to go to your extended phone’s voicemail. This is useful if you do not want callers filling your mobile voicemail box. If you are not able to answer the calls in time, you should increase this value.

- Click Save, and then close the browser.
- Please a test call to determine if any of the advanced call timing settings need to be adjusted. If so, open the new phone settings, click Advanced call timing, change the appropriate values, and then click Save.
Specific Instructions for Greater China (GC) Data Center
If you are running a Collaboration Demonstration from the GC data center, please follow these guidelines for dialing an outside number from the session: Dialing internationally out from China: 9 + 00 + Country code + phone number Dialing long distance from China: 9 + 0 + city code + phone number Dialing within Shanghai city: 9 + 8 digit phone number If you are having trouble connecting to Single Number Reach out of the GC data center, you may need to adjust the timing of the calls in the Cisco UC Self Care Portal. Follow these instructions to make the changes:
- On Workstation 1, launch Internet Explorer and navigate to Collaboration User Links > CUCM User Pages.
- Continue to the website and allow or accept any prompts to trust site.
- Login using Adam McKenzie’s credentials from your specific session: User Name: ***; Password: ***.
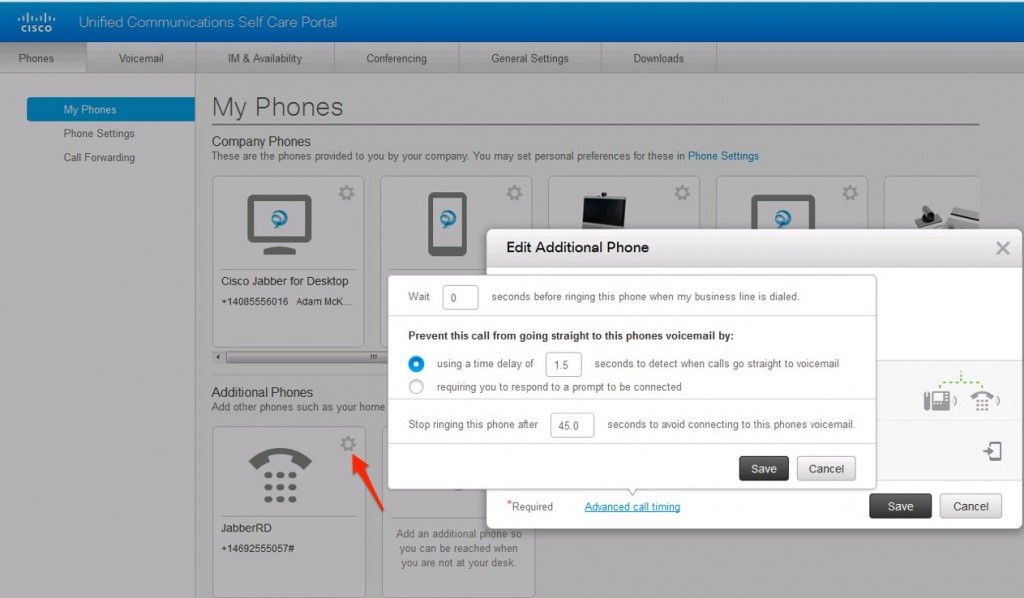
- Go to Phones > My Phones > Additional Phones and then click the Edit icon [
 ] to edit the details for your mobile number.
 - Click Advanced Call Timing and configure the values as shown below. Click Save twice to commit the changes and exit.
Configure Single Number Reach for Collaboration 9.0
- On Workstation 1 launch Internet Explorer and navigate to Collaboration User Links > CUCM User Pages.
- Continue to the website and allow or accept any prompts to trust site.
- Login using Adam McKenzie’s credentials: User Name: amckenzie; Password: C1sco12345.
- Under the Alternate Numbers section, click Add New.
- In the Add New Alternate Number window, enter the mobile number in the correct format for your session environment as shown in Outbound Dialing Patterns and Blocked International Dialing.
- Enter a Description for the alternate number (for example, Mobile Phone).
- From the Use the setting from dropdown select amckenzie-rdp.
- Ensure the following check boxes are checked:
This is a mobile device Enable Reach Me Anywhere for this alternate number (Must be checked in order for the Associate check box to display) Associate
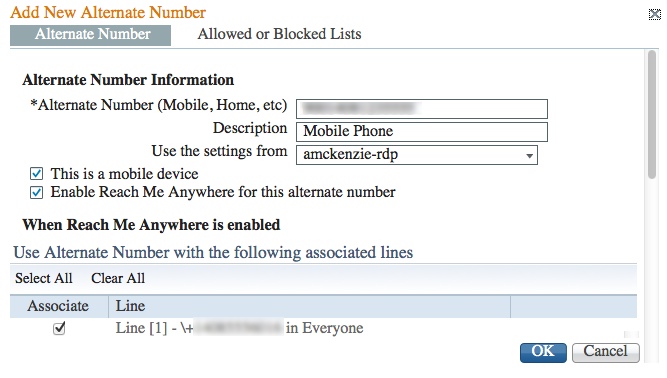
- Click OK, and then close the browser.
![]() Back to top
Back to top
