dCloud Help
Find the answers you need to get started using dCloud.
Quick Links

Configure DX650 for Cisco dCloud
February 2018
Configure the DX650 for VPN Access
If you are using a router, it is preferable to connect the DX650 to the endpoint router. If you are not using an endpoint router, you can connect the DX650 to the session environment using the built-in VPN capability. This allows you to demonstrate all features of the DX650 without a router.
- Connect the DX650 to an active Internet connection using either the wired Ethernet port or Wi-Fi.
- You must be logged into the dCloud UI and your session must be active to perform this activity.
- Open My Hub > Sessions and locate your active session.
- Click View.
- Click Details on the blue menu bar.
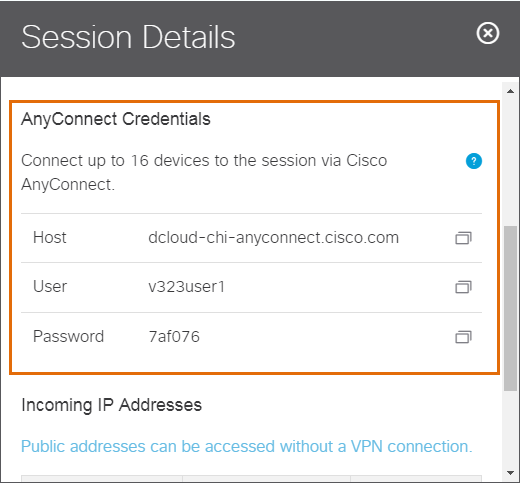
- In the Session Details window, scroll to the AnyConnect Credentials section. The AnyConnect Credentials shown are needed to connect the DX650 to the session environment.
- On the DX650, go to Settings > Wireless & Networks > More... > VPN.
- Tap Add VPN network.
- Click OK to dismiss the Emergency Response Notification.
- On the Add New Connection page, enter the details for your VPN connection:
- Description: dCloud VPN
- Server Address: Host address from the AnyConnect Credentials
- Tap Save.
- Select the dCloud VPN entry.
- When prompted, enter a Username and the Password from the AnyConnect Credentials of your session.
- Tap OK.
- Tap Accept.
Configure DX650 Apps
To configure the DX650 for a dCloud user, replace the username parameter with the actual username of the dCloud user.
Ensure that the DX650 has been provisioned and is registered with the Cisco Unified Call Manager.
Configure Email
- Go to Settings > Setup Assistant > Email.
- Enter the ID and password:
- Email ID: username@dcloud.cisco.com
- Password: C1sco12345
- Select Next.
- For Account Type select Exchange.
- Enter the Exchange settings:
- Domain nameusername: dcloudusername
- Password: C1sco12345
- Server: mail1.dcloud.cisco.com
- Use secure connection (SSL): Checked
- Accept all SSL certificates: Checked
- Select Next.
- Accept all security warnings and remote access requests. The DX650 will sync all email.
Configure Jabber
- Go to Settings > Setup Assistant > Chat.
- Accept the license agreement.
- Enter the email address: username@dcloud.cisco.com and click Continue.
- Click Unified Presence and update as follows:
- Password: C1sco12345
- Server IP address: 198.18.133.4
- Accept all SSL certificates: checked
- Click Sign In.
Configure WebEx
- Go to Settings > Setup Assistant > WebEx.
- Agree to the terms of use.
- Enter the email ID: username@dcloud.cisco.com.
- Select Next.
- Enter the password: C1sco12345.
- Select the WebEx server: us-gdp.webex.com OR uk-gdp.webex.com.
EMEAR users select uk-gdp.webex.com. US, APJ and GC users select us-gdp.webex.com.
Configure Voice Messages
- Go to Settings > Setup Assistant > Voice Messages.
- Account Name: username
- Password: C1sco12345
- Accept all SSL certificates: checked
- Tap Save.
![]() Back to top
Back to top
