dCloud Help
Find the answers you need to get started using dCloud.
Quick Links

Cisco Unified Communications Manager QR Activation Code
January 2020
Cisco Unified Communications Manager (CUCM) is the core call control application for the Cisco on-premises Collaboration portfolio. It provides reliable, highly secure, scalable, and efficient enterprise call and session management.Activation Code On-boarding
Activation code on-boarding is a quicker and more simplified way to deploy endpoints for CUCM. Once a user is provisioned, the end user can enter a 16-digit code or scan a QR code on the device to securely authenticate and register CUCM. You can dispatch any supported phone, which means no mode searching to find a phone with a specific MAC address. The new activation code onboarding process is a better experience for new users, saves time, and helps reduce the total cost of phone deployments. This new Activation Code method can be used with the following phone models: 7811, 7821, 7832, 7841, 7861, 8811, 8841, 8845, 8851, 8851NR, 8861, 8865, and 8865NR.- Ensure the Cisco Device Activation Service is activated and running:
- From WKST1, open a browser (Mozilla Firefox recommended) on desktop.
- In the Web browser, select Collaboration Admin Links > Cisco Unified Communications Manager.
- Login as amckenzie@dcloud.cisco.com with password dCloud12345!
- In Cisco Unified CM Administration, select Cisco Unified Serviceability from the Navigation drop-down menu. Click Go.

- From the Tools drop down, select Control Center - Feature Services.
- Select dcloud.cisco.com- CUCM Voice/Video from the Server drop down. Click Go.
- Scroll down to the CM Services section. Make sure Cisco Device Activation Service is Started. If it is not Started, click the radio button beside it. Scroll to the bottom of the page and click Start.
- Set the registration method to use Activation Codes for the intended phone model:
- From the Navigation drop-down menu (top right corner), select Cisco Unified CM Administration. Click Go.
- Navigate to Device > Device Settings > Device Defaults.
- Scroll down to the Dual Bank Information By default, all phone models are configured for Auto Registration. Next to the phone model you want to register using the Activation Code, select the Onboarding Method drop down option Activation Code. Scroll to bottom left of the page and click Save.
Make sure you perform this step, otherwise phone will auto register with temporary extension.
- Add the New Phone:
-
- Navigate to Device > Phone.
- Click Add New From Template. Required fields will auto populate for the phone to register.
- Select following parameters:
- Phone Type - Choose model of the phone you enabled for Activation Code in Step 2.
- MAC Address - Enter the MAC Address of the device if you have one or choose a dummy MAC Address (make up your own MAC Address). If you choose to add a dummy MAC Address, CUCM will update it to the correct address during registration process. NOTE: A MAC Address must be exactly 12 or 17 characters long. Format examples: 00A0C914C829 or 00:A0:C9:14:C8:29.
- Device Template - dCloud Self-Provisioning DT – New.
- Directory Number (Line 1) - Either choose the one existing (such as any prime user 6016 to 6025) or add a new DN.
- User (Optional) - Select the user you want to associate this phone to.
- Click Add.
- In the Device Information section, add a check mark for Require Activation Code for Onboarding. Click Save. When prompted, click OK. Click Apply Config. When prompted, click OK.
- Click View Activation Code to get the activation code. Also, the user (the one you associated the phone to) can login to their self-care portal and get the activation code. Users can enter the code on the device manually or they can use the phone’s video camera to scan the barcode that is displayed in the self-care portal. Once the activation code is entered or bar code is scanned, CUCM will authenticate the phone and it will start the registration process.
- Allow a few minutes for the phone to register.
-
- Navigate to Device > Phone.
- Click Add New.
- Select following parameters:
- Phone Type - Choose model of the phone you enabled for Activation Code in Step 2. Click Next.
- MAC Address - Enter the MAC Address of the device if you have one or choose a dummy MAC Address (make up your own MAC Address). If you choose to add a dummy MAC Address, CUCM will update it to the correct address during registration process. NOTE: A MAC Address must be exactly 12 or 17 characters long. Format examples: 00A0C914C829 or 00:A0:C9:14:C8:29
- Put a check mark for Require Activation Code for Onboarding.
- Populate the rest of the fields as required. For most fields you can keep Default, but you need to assign the phone to an Owner User ID and also add new DN or select existing DN for the user.
- Scroll to the bottom of the page and click Save. Click OK when prompted.
- Click Save. When prompted, click OK. Click Apply Config. When prompted, click OK.
- You will need to associate the device to the user as well. Navigate to User Management > End User. Find your user with First Name or Last Name from the drop-drown fields. Click your user name. A new screen will open.
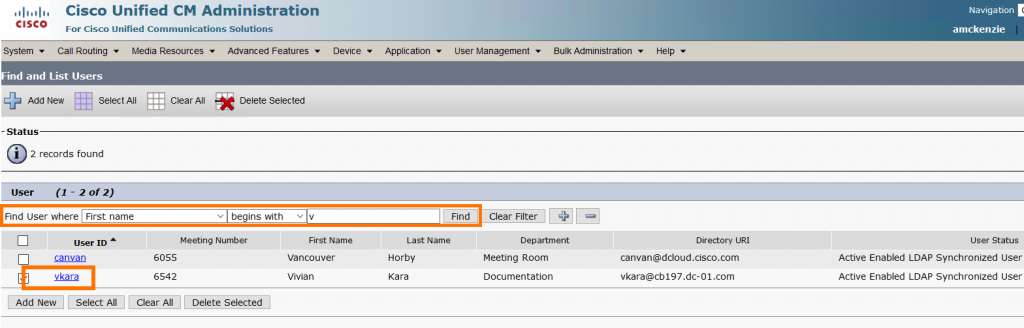
- Within the new screen, scroll down a bit and click Device. Click Phone and look for the phone you added..
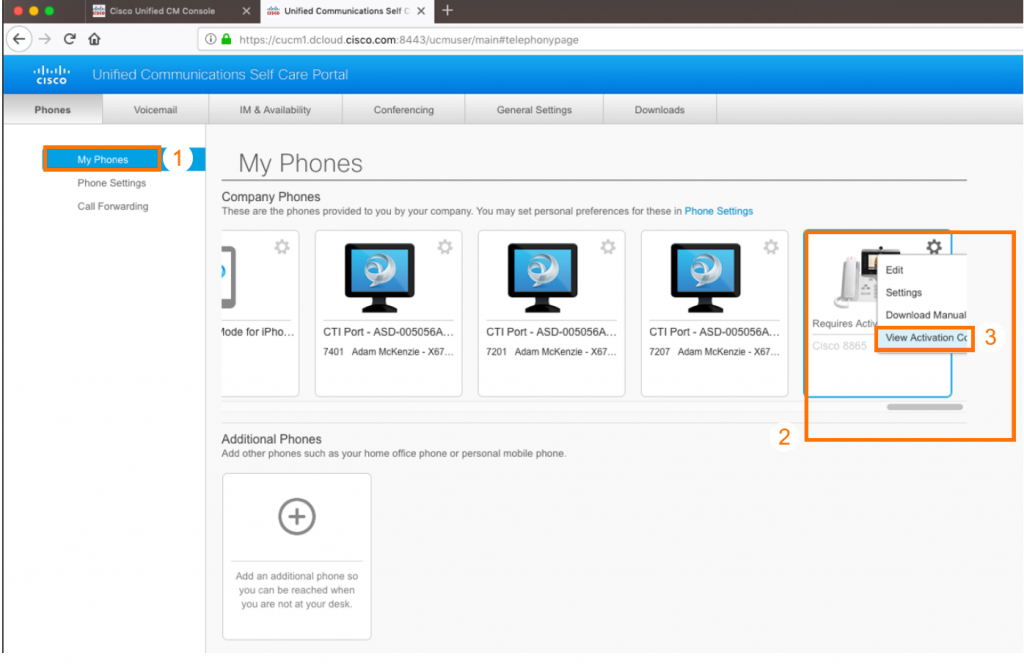
- Click View Activation Code to get the activation code. Or the user (the one you associated the phone to) can login to their Self-Care Portal and get the activation code.
- After your login to Self-Care User Page, click My Phones. Click the Settings gear icon for the newly added phone and select View Activation Code.
- Users can enter the code on device manually or they can use phone’s video camera to scan the barcode that is displayed in self-care portal.
- Once the activation code is entered or bar code is scanned, CUCM will authenticate the phone and it will start registration process.
- Allow a few minutes for the phone to register.
![]() Back to top
Back to top
